Have you ever pondered How far into the ground does a retaining wall need? It’s not just about stacking blocks or pouring concrete. The depth is crucial. Imagine trying to hold back the earth itself with nothing but your bare hands. Sounds impossible, right? That’s because it is without proper support.
The truth might surprise you: it’s all about half and whole numbers in a dance with gravity and soil. For some, it could mean digging down two feet below frost lines; for others, even deeper trenches beckon for stability against nature’s pushback.
We’re talking foundational secrets that make or break landscapes in Lee’s Summit homes—where the difference between an enduring structure and a leaning disaster can hinge on inches of preparation beneath the surface.
Let me tell you something fascinating: there are walls out there braving elements without breaking sweat—all thanks to meticulous groundwork that often goes unnoticed yet remains paramount.
Understanding the Depth Requirement for Retaining Walls
The Importance of Depth in Wall Stability
Ever wonder why some retaining walls stand tall through seasons and storms, while others lean or crumble after a short time? It’s not just about what you see above ground. A big part of the secret lies beneath, where it all starts: the foundation.
Exploring the depths isn’t solely reserved for soul-searching; it’s equally vital in constructing a sturdy retaining wall. Think of it like planting a tree; its strength comes from roots that go deep into the earth. Similarly, your wall needs a solid base underground to withstand everything nature throws at it.
Factors Influencing Depth Requirements
The “one-size-fits-all” approach doesn’t apply here because several factors come into play:
- Frost line: This invisible line varies by region and is as important as your morning coffee routine. If your wall’s footing sits above this line, frost heaving could turn your structure into something resembling abstract art rather than functional landscaping.
- Soil type: Some soils hold hands better than others—meaning they stick together well—and some don’t. Sandy soil or clay can affect how much support your wall will get from below.
- Ground level changes and water runoff: Ever noticed how landscapes are rarely flat? Those ups and downs matter when planning where and how deep to dig for stability against shifting land or flowing water.
To nail down specifics: if we’re talking about burying our worries (or in this case, blocks), experts suggest burying at least half the height of the first course of blocks. So if you’re eyeing that towering four-footer across your backyard slope, start thinking about digging two feet down before laying those foundational pieces—a task easier said than done but worth every sweat drop.
Besides depth considerations based on aesthetics or functionality (e.g., holding back hillsides or creating garden beds), local regulations may also dictate specific requirements. Always check these out unless you want an unexpected visit from city officials.
Selecting the Right Materials for Your Retaining Wall
Comparing Material Options
Let’s talk materials, shall we? When it comes to building a retaining wall, not all blocks are created equal. You’ve got options like cinder block and those fancy interlocking retaining wall blocks. Each has its fans and its uses.
Cinder blocks? They’re the old-school choice. Affordable, durable, but let’s be honest – they won’t win any beauty contests. However, with some creativity (and maybe a coat of paint), they can look pretty snazzy.
Then there’s the modern warrior – retaining wall block. Erosion’s adversaries, these warriors stand tall, melding elegance and robustness in their stance. They lock together like puzzle pieces which makes them easier to install than you might think.
Essential Materials for Durability
Beyond just picking out your main material hero, don’t forget about their trusty sidekicks: landscape fabric and paver base. Like Batman needs Robin; these materials need each other to give you that quality wall that lasts through seasons.
- Landscape Fabric: This is what keeps your soil from making unwanted moves on your gra
vel or sand base layer. Halting weed growth is also a crucial benefit it offers. - Paver Base: Think of this as the foundation of your project—a solid start leads to a strong finish after all. A sturdy paver base ensures everything stays level over time.
You’ve got choices when it comes down to it—whether going classic with cinder blocks or choosing sleeker interlocking systems—just make sure not to skimp on those essentials underneath.
In essence: mix durability with aesthetics by selecting both practical construction elements like cinder block while incorporating landscaping design elements such as river rock accents around or atop your retaining walls. This way, you get functionality coupled beautifully within one cohesive landscape architecture vision. Now isn’t that something worth considering?
Designing Your Retaining Wall for Maximum Efficiency
Incorporating Aesthetic and Functional Elements
So, you’re thinking about adding a retaining wall to your landscape. Great choice. But it’s not just about piling up some blocks. The magic happens when function meets form.
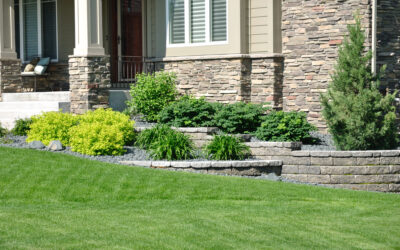
A well-designed retaining wall does more than hold back soil—it becomes a statement piece in your garden. Imagine integrating built-in seating or planting beds into the design. Suddenly, it’s not just a wall; it’s part of your outdoor living space.
Consulting with a Landscape Designer
You might be tempted to dive right in, but let’s hit pause for a second. Consulting with a landscape designer can elevate your project from good to breathtaking.
- The Why: They’ve got the vision—transforming sloped yards into terraced masterpieces, advising on which materials blend best with your home’s aesthetic.
- The How: From dealing with tricky slopes to ensuring proper drainage behind the walls—a pro knows how to tackle these challenges head-on.
- The Wow Factor: Ever thought about incorporating waterproof membranes for added durability? Their know-how really shines through in these moments.
Making sure every element plays its part requires thoughtful planning and creativity—an exciting journey towards achieving both beauty and functionality in one go. Ready to take that step? Let me know what ideas are brewing in your mind.
Preparing the Base for a Strong Foundation
Alright, folks. Let’s talk about getting your hands dirty – in the best way possible. Jumping right in, we’re tackling the nitty-gritty of priming your soil and establishing a sturdy foundation for that retaining wall you’ve been dreaming about. It’s like baking; you need a good recipe and some patience.
Steps to Prepare the Ground and Base Layer
First things first, grab your gear because we’re going on an adventure in landscaping.
- Pick Your Spot: Choose where that beautiful wall of yours is going to live. Make sure it’s somewhere needing some TLC or trying to hold back Mother Nature.
- Dig Deep (But Not Too Deep): You’ll want to dig out a trench where your first row of blocks will sit. Think about burying treasure, but this time it’s stone dust instead of gold doubloons.
- Tamp It Down: Get yourself a tamper and make that dirt floor as flat as Kansas. A stable foundation starts with compacted soil.
- Lay Down That Stone Dust: T
his is where our star player comes in – stone dust. Sprinkle around 2 inches over your tamped soil. Then tamp again until everything feels solid underfoot. - The Level Dance: With a screed or carpenter’s level in hand, do the dance of making sure everything is perfectly horizontal—no slopes unless they’re intent.
Your hard work now sets the stage for what comes next — layers upon layers of gravity-defying artistry (also known as laying block). And there you have it. From picking just the right spot all the way through dancing the level dance, you’ve prepared a strong foundation that awaits its crowning glory (aka the rest of the retaining wall). Don’t forget to give yourself a pat on the back – job well done.
So go ahead and build something amazing, because when it’s based on rock-solid (no pun intended), the possibilities are endless. Remember, every great project begins from the ground up… literally in this case.
Happy building.
Building Techniques for a Durable Retaining Wall
Laying Blocks Correctly
You’ve decided to tackle that slope in your yard head-on. Kudos. Constructing a retaining barrier is certainly no walk in the park, yet here you are, ready to dive into the fray. Let’s start with laying blocks correctly because trust me, this can make or break your wall (literally).
The first rule of thumb? Always bury the first course of blocks. Think about it like setting the foundation for your house; stability is key. For a 4-foot high wall, aim to bury those initial blocks about 4-6 inches below ground level. And don’t skimp on digging out space for drainage gravel along each side—about 12 inches wider than the block should do it.
Utilizing Interlocking Systems for Stability
Moving onto interlocking-block systems – these are gold when building retaining walls that last. Just like snapping together pieces of a Lego set, these interlocking modules fortify against the relentless push and pull of eroding earth and cascading waters.
All right, let’s talk technique real quick: Start with leveling off that trench you dug earlier using sand or stone dust as your base material then compact it down good and proper with either hand tools or rental equipment from local shops if necessary—flat is what we’re aiming for here folks.
A pro tip? Use a rubber mallet to gently tap each block into place ensuring they’re snug against one another while keeping everything level across the top.
Incorporating these steps into your building process not only lays down strong physical foundations but also instills confidence within yourself knowing you’ve built something sturdy enough stand test time—and nature’s elements too. Now go forth lay those blocks pride because my friend – you got this.
Ensuring Proper Drainage Behind Your Retaining Wall
Importance of Backfill and Drainage Systems
Got a retaining wall or thinking about building one? Let me tell you, there’s more to it than just piling up some blocks. One word – drainage. Without proper backfill and drainage systems, your beautiful wall might just take an unexpected tumble.
We’re talking water runoff nightmares that can push against your wall harder than a crowd at a concert trying to get to the front row. Not what you want, right?
- Backfill basics: This is all about the dirt behind the wall. But not just any dirt – we’re looking for quality here. Think compacted native soil topped with gravel for that sweet drainage action.
- The role of gravel: Gravel isn’t just pretty rocks; it’s your best friend when combating water pressure buildup behind your retaining walls.
- Pipe dreams: A perforated pipe installed along the base acts like an underground escape route for trapped water, keeping hydrostatic pressure off your walls’ backs.
If you skip on this step? Well, let’s say it could lead to some soggy issues. Water buildup equals increased pressure which means hello, potential collapse. We don’t want our yard turning into an unintentional excavation site overnight now do we?
Beyond avoiding disaster scenarios involving half-buried lawn gnomes and flower beds in disarray from a fallen wall—proper drainage also ensures longevity and durability in your landscape investment. Remember those science experiments where too much water would burst through paper barriers? Yeah—it’s kinda like that but with way higher stakes (and costs).
To sum up: think of backfilling and setting up good drainage as giving your retaining wall superhero armor against its arch-nemesis: excess moisture. It keeps everything stable, secure, and most importantly — standing tall so you can sit back, relax, and enjoy that backyard view without worrying every time dark clouds roll in.
Preventing Common Failures in Retaining Walls
Identifying Potential Issues Early On
Alright, let’s talk about keeping your retaining wall standing strong against the forces of nature. It sounds like a superhero task, but really, it’s all about knowing what to look out for. We’re dealing with three main villains here: blowout failure, wet-soil failure, and frost-heave failure.
- Blowout Failure: This is when your wall says “I’ve had enough.” and gives way under pressure. Picture this as the wall getting a sudden case of hiccups from too much weight behind it.
- Wet-Soil Failure: Just like you’d slip on a muddy hill, walls can also lose their grip when soil gets too soggy. The water makes the soil heavy and slippery – not exactly what you want pressing against your wall.
- Frost-Heave Failure: Ever left a soda can in the freezer? That expansion is similar to what happens underground when water freezes and expands – pushing against your wall with an icy shove.
To beat these issues at their own game,
- Dig deep. Make sure that base is buried well below ground level because stability starts from beneath.
- Add proper drainage because no one likes soggy feet – least of all your retaining wall. Use gravel backfill or install drains behind the structure to give water an easy exit route.
- Mind those weather reports. In areas prone to freezing temperatures, using insulation materials or adjusting depth based on local frost lines could save you big headaches later.
- Last but not least: keep an eye on things. Regular checks for signs of stress or movement will help catch problems early before they turn into catastrophes.
No need for panic; prevention truly beats cure here. With some watchfulness and savvy construction choices, your retaining wall won’t just be another statistic in failed landscaping attempts. Instead, it will serve as a shining example of careful preparation and intelligent architecture, not only protecting your land but also boosting its visual charm.
Enhancing Your Landscape with a Retaining Wall
Choosing the Right Decorative Elements
Selecting the right embellishments for your wall is not only enjoyable but also essential in harmonizing the aesthetic of your outdoor space. Let’s dive into two favorites: landscape fabric and river rock.
- Landscape Fabric: This unsung hero prevents weeds from crashing your garden part
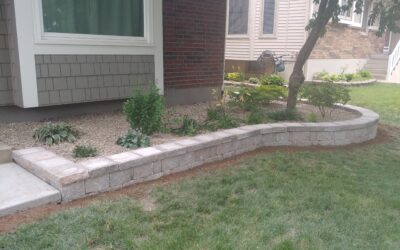
y behind the scenes. Plus, it helps keep soil moisture levels just right. - River Rock: Want an instant boost of natural beauty? River rocks are here to save the day. Use them as an accent along the base of your retaining wall or between plantings for a polished look that screams “I hired a pro” (even though we both know it was all you).
The bottom line? Creating stunning landscapes with retaining walls doesn’t need deep pockets—just deep imagination (and maybe some elbow grease). So get out there and transform that slope into something spectacular.
Legal Considerations and Compliance
Navigating Local Regulations
Alright, so you’ve decided to build a retaining wall. You’re probably thinking about materials, design, maybe even the color scheme that’ll make your neighbors green with envy. But hold up. Before you start dreaming too big, there’s something super important we need to chat about: local building codes.
Yes, I know. It sounds like a snooze fest but stick with me here. These regulations are not just red tape; they’re there to keep everyone safe – including your beautiful backyard from turning into an accidental landslide.
The Importance of Obtaining Necessary Permits
You might be asking yourself, “Do I really need a permit for a retaining wall?” Short answer: yes. The longer answer? Getting that piece of paper is crucial because it means your project meets all safety standards set by those in the know.
- Safety first: A permit ensures your wall won’t collapse during the next heavy rainstorm.
- Avoid fines: Building without one could lead to penalties or being forced to tear down your hard work.
- Peace of mind: Knowing everything’s above board lets you sleep better at night (and keeps the neighbors happy).
Embark on this expedition through bureaucratic bliss by exploring the specific prerequisites your locale demands. Each municipality harbors unique eccentricities regarding the permissions and guidelines essential for erecting features such as retaining barriers. Maybe you can have that fire pit after all.
In essence, navigating local regulations and getting necessary permits isn’t just another hurdle; it’s part of laying the groundwork for a quality wall that stands strong against time – and weather. Plus, once you’ve got this sorted out early on in the process, then guess what? You’re free as a bird (or should I say as stable as a cinder block) – wink wink -to move onto more exciting parts of building something awesome outdoors.
Maintenance Tips to Prolong the Life of Your Retaining Wall
Regular Inspection and Upkeep
Let’s talk about keeping that retaining wall standing tall and proud, shall we? First off, a little TLC goes a long way. Make it a habit to stroll by your wall every now and then. Look for any signs of wear or tear—cracks, bulges, or sections looking like they’ve seen better days. It’s all in the details.
Next up: vegetation control. Yes, those tiny sprouts can seem harmless but give them time, and they’ll turn into mighty forces capable of moving blocks around. So pluck ’em out before they get too cozy.
Last on our list here is checking drainage systems because water trapped behind your wall is pretty much asking for trouble. Keep those weep holes clear and free from debris.
Dealing with Efflorescence
Ah yes, efflorescence—that chalky white residue that likes to crash the party uninvited. What’s happening here is minerals from within concrete blocks make their grand escape when water moves through them. Dive deeper into the strategies for eradicating that uninvited, chalky guest known as efflorescence right here.
The good news? It’s mostly an aesthetic issue rather than structural doom saying “I’m falling apart.”. But let’s keep things looking sharp:
- Clean regularly: Use a stiff brush paired with plain ol’ water or go fancy with diluted vinegar if you’re feeling adventurous.
- Lay down protection: Consider applying sealants designed for concrete block walls, especially ones prone to mineral efflorescence outbreaks. This will help create a barrier against moisture penetration.
- Contact pros for stubborn cases: If DIY methods aren’t cutting it; professional landscapers like Evolving Landscapes have some tricks up their sleeves worth considering.
Conclusion
So, we’ve trekked through the gritty details of how far into the ground a retaining wall needs to go. It’s not just about slapping soil and stone together but understanding the dance between gravity, frost lines, and soil types. Who knew that beneath every sturdy wall lies a tale of hidden depths—quite literally?
This isn’t your average backyard project; it’s an adventure below ground level where each inch dug can mean the difference between a lasting legacy and a leaning catastrophe. Digging beneath the surface, we’ve revealed mysteries that elevate simple settings into formidable defenses against the caprices of Mother Nature.
Think about it: those unnoticed efforts create barriers so resilient they scoff at weather extremes without breaking sweat. From picking the right materials to mastering drainage essentials—we covered it all because when you get down to earth (pun intended), knowing these foundational truths is what keeps your landscape dreams from crumbling.
The bottom line? That question about how deep your retaining wall should go carries weight beyond measure. But now, armed with knowledge straight from Lee’s Summit’s underground playbook, you’re more than ready to turn any potential disaster into a triumph of stability over chaos.
We didn’t just scratch the surface; we dug deep because in this world of dirt and determination, depth truly does matter—and now you know exactly why.